Showing posts with label craft. Show all posts

Monday, December 19

our advent count down

usually we just have this cute little chalkboard that counts down the days to christmas.  or as my husband likes to remind me, the countdown to "chritmas".  ahem.


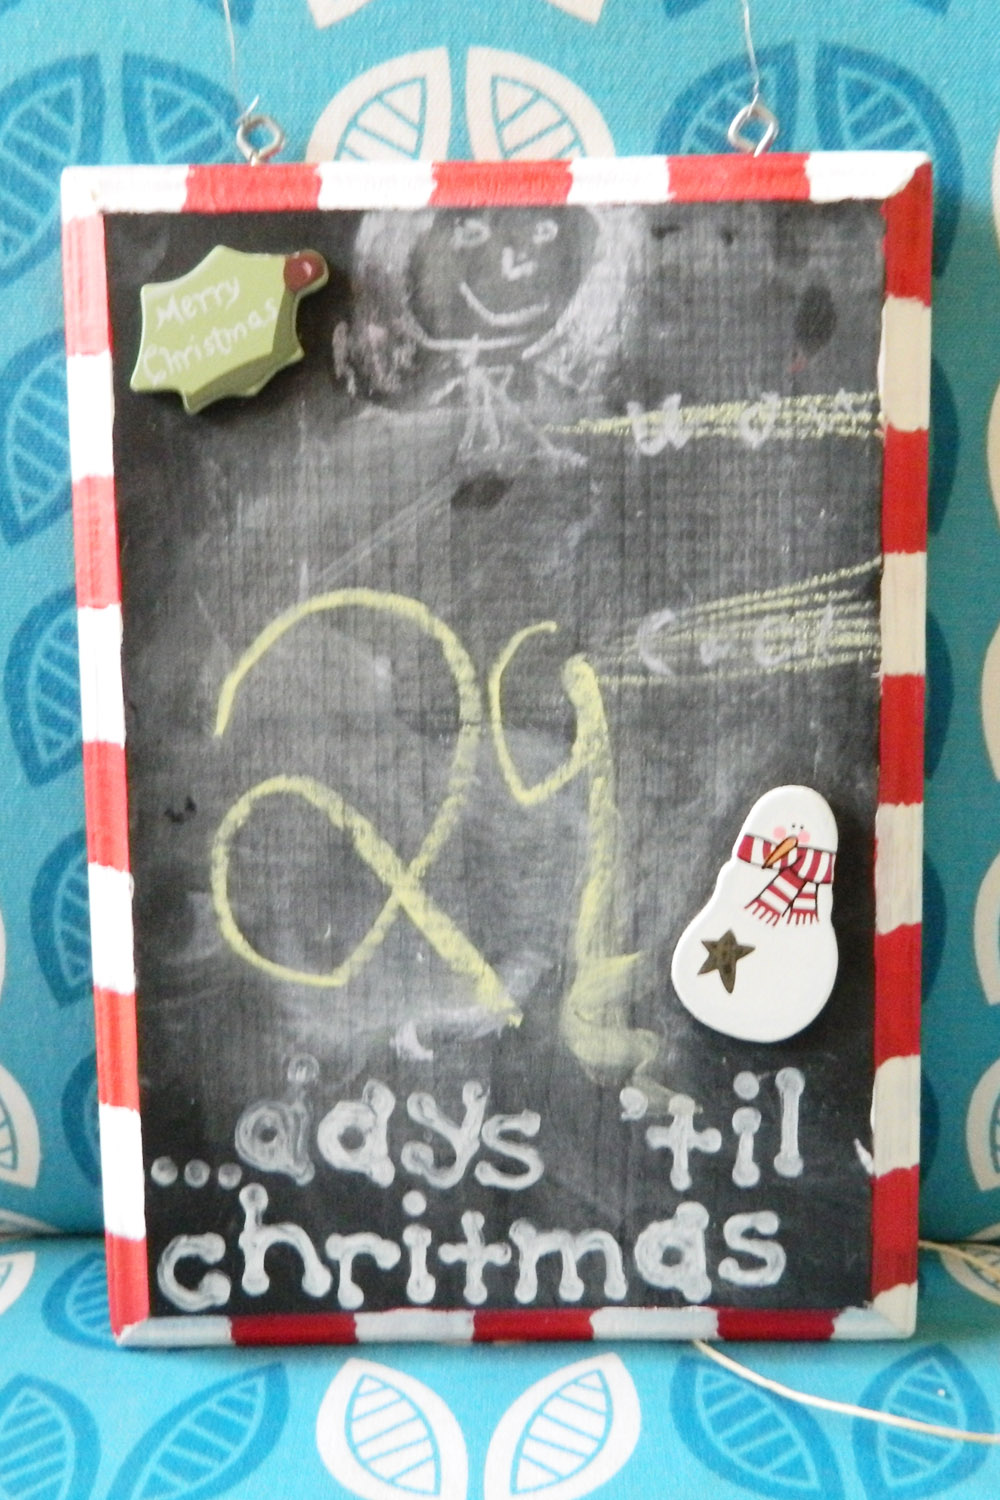
i made this little chalkboard ages ago in a MOPS meeting.  i was the craft coordinator and NO ONE pointed at my mistake!  and of course i painted it with a paint pen and i just have never bothered in 7 years to repaint the little part.  call me lazy.

i finally decided to make a new advent countdown by stitching up little bags to hold goodies and activity ideas.  i was going to quickly whip them up, add a pretty red number and use my endless stash of ribbon for cinching.  guess what my mistake was?  i thought it would be quick.  not quite.  i love them, but they were a tiresome little project.  i used a green gingham for all the bags.  i may or may not have chosen the green because i knew i would have to cut up my curtains to have enough material just so i would have an excuse to buy more fabric for the curtains.


but i did get the little guys finished, sort of.  some are missing ribbons, and all the little strings left over from sewing need to be cut.  my kids don't care though about perfection because they're cool like that.  oh, your's aren't?  i'm sorry.


the hardest part was coming up with idea to put in there.  i didn't want dinky toys or candy in all of them.  my kids are out of school for the all but a few days of december so we had the luxury of different activities to include in them christmas-y or not.   here's some of what i came up with:

ornaments for their little trees.  that was the first day.
candy which i took out of the stocking stash for christmas because i hadn't come up with an activity.  call me lazy again.
look at christmas lights
go caroling with church
read luke 2 from the bible
make christmas fudge
watch a christmas movie
make christmas cookies
go to the museums downtown
buy and donate food to the food bank
see the christmas play at church
sleep under the christmas tree
make christmas ornaments

luckily we missed some days so i didn't have to come up with 24 ideas.  plus i put the different christmas movies in different bags, so that took care of 5 bags!   elf, polar express, charlie brown's christmas, christmas carol, emmet otter's jugband christmas.

oh?  you don't know that last one?  i didn't either!  i had never heard of it until i got married and learned this is my husbands favorite christmas movie.  so stinking cute!  barbecue is the best song ever.  they stream it through netflix.  woo-hoo!  my kids haven't seen it in several years so i was so happy to see netflix has it now.


merry "chritmas"!

Wednesday, June 29

pieced together party favors

I admit the cynical part of me thinks, I'm inviting you to come to the pool, paying your way, feeding you pizza, and feeding you yummy birthday brownies, with homemade lemonade no less....do I really NEED to give you a goody bag too?!  Doesn't that make me sound terrible?!

But I don't want to be THAT parent...the one whose poor child is too embarrassed to tell her friends there are no favor bags to send home with them from the birthday party.  So I give out nice little gifts but appease myself by making them on the cheap.

the birthday girl!  

One year I did crayon rolls, another I made homemade stickers and put together little notebooks, this year I threw together a hodgepodge of items.

We made a sweet little bubblegum bracelet.  My daughter and I raided her bubblegum machine for this project and I already had the ribbon on hand.  To make them simply thread the ribbon through the bubble gum and knot on between each gumball.  Easy!


I then picked up some fun fingernail polish at Target ($.84 each!).  I whipped up a little personalized label and there you go.


The most time consuming was making the rosette flower barrettes.  But, I had the fabric, the hot glue gun, and the barrettes....so I figured why not?  I think they are so precious!


I impressed a bunch of 6 and 7 year old little girls and my daughter was proud to hand out the little favor bags.  Total success!  And it cost me less than $5 for 5 treat bags, woohoo!

Monday, January 3

handmade presents

This year for Christmas I added a lot of handmade gifts to our list.  I'm always hesitant to make gifts because I don't want to seem cheap.  Which is SO crazy since I know people give my items as gifts!!  If they are good enough for strangers, then they're good enough for my family, right?!

I made this cute little superhero cape for my 3 year old nephew.  LOVE how it turned out!!  Isn't the cutest?
I wish I had a taken a picture of on him at Christmas, but I didn't think about it.  Oh well.  He looked cute and strong and brave like any good superhero should. ;)  The flip side is orange.  Hmmm, looking at the picture I now wish I had taken a better picture of it...Just trust me, it was stinkin' cute.

The kids made the next gift.  They each made a stepping stone for a set of grandparents.


I also made some bibs, a library bag, dish towels, and a bunch of zipper pouches with tissue cozies, and note cards.  But, I didn't get any pictures of those!  

Maybe a New Year's resolution of mine should be to take more pictures.

Friday, December 10

easy peasy christmas decorations

I want to show you to of my easiest and favorite decorations I made this year.  So simple and I just LOVE them!

First are my yarn trees.  I actually bought two styrofoam trees last year with the hope of putting ruffles around them.  Cute idea, right?  Well, I couldn't get mine to look right at all.  Of course when I finished my yarn trees I found that Lindsey (she's got a great name!) at The Pleated Poppy did some fabric wrapped trees that are adorable.  Scroll down a bit to find them on her mantle.


I still love my yarn trees though.  I simply glued down the end of a real nubby yarn at the base of the tree and started carefully wrapping the yarn, gluing every so often.  At the top I just kinda wound it around until it looked nice before gluing it.  If you're using a colored yarn, you might want to paint the styrofoam first.   See that little glittery church?  I saw it first at Thrify Decor Chick and simply had to stop by the Wal-mart and pick one up.  And I hate the Wal-mart, but a $1 for a cute little church was worth it. :)


Second, is this to die for feather wreath.  Cuteness, right?  Well, maybe some of y'all don't like it, but that's okay. :)  I took a simple green styrofoam wreath and spray painted it white.  I took two packages of feather boas and wrapped my wreath.  Three would have been a better length, but I couldn't find cheap feather boas so I worked with just two.  I then just pinned a pretty polka dot ribbon to the back and there ya' go.  I simply love it so much, I just might keep it year round.

I can't get a good shot of the lovely thing as seen from afar!  The room has become quite dark and all pictures simply do NOT do her justice.   So, just enjoy a good closeup of her feathery goodness!


I'm linking up here:

Friday, October 15

More Goodwill Love

I've had another Goodwill project waiting for me in my garage for a few months now.  I wasn't sure what I was going to do with it at first, but finally I decided to make a little homegrown fabric art for my littlest son.

I bought this frame for $2.95!  Do you KNOW how much frames cost in the store??  This was ridiculously cheap.  Of course, I bet my husband thought it was $2.95 too much when he saw it in the garage.  Ugly, right?


I turned it into this with the help of a little fire engine red spray paint and some fabric scraps I had on hand.  If you don't have fabric, paper would be just cute as can be and not so "stringy".   Again, like all my projects, I'm not sure I'm in love with it yet.  I love the IDEA of it, but  I think the yellow and striped car doesn't have enough contrast with the polka dot background.  But, like all my projects, I have a feeling that even though I hung it of reach, the littlest one will find a way to tear it up.  It's not that he MEANS to tear things up, it's just he's so curious.  But it looks happy in his room, and he told me he likes it.  And that's all that matters.  So don't be hater if you don't like it!

The moral of this story, though, is to go by the Goodwill BEFORE you head to the store looking for a picture frame, lamp, or other whatnots.  You might not find what you want, but you don't know unless you try!

Tuesday, August 31

I am SO last year

This family rule canvas has been floating around in blogland for EVER I know.  I first saw the idea over at this blog I stalk daily, ahem.  But, I finally did one a few weeks ago, I don’t mind  being a little “last year.”  It's far from perfect, FAR from it.  I, however, gave up perfection so long ago, that I don't care anymore.  It's the imperfections that make life real.creation 002 copy

But, I think I like how it turned out, even if I’m not totally loving the quality of my work.  One day, I may try again and use scrapbooking stickers.
  creation 003 copy
But being the frugal person I am, I used what I had which was fabric, homemade modge podge, and transfer paper.  I’m a font lover so I have TONS at my disposal.  Simply print onto transfer paper (do not forget to reverse the design!!  I made that mistake a few too many times than I like to admit.)   Iron onto fabric, glue onto the canvas, and apply modge podge.  I use a mixture of glue and water.  creation 005 copy
I added some ric rac and ribbon to break it up a bit.  I’m not loving however the way the transfer paper looks a little shiny.  Oh well.  Like I said, I can always redo it one day.   And I don’t like how I didn’t quite take the time to even up the edges.  I think I was trying to hurry and complete this before the big kids came off the bus and the baby woke up from his nap.   But, it feels the space in nicely and adds a little color. 
More importantly, it tells whomever comes in our home what we believe and value as a family.
creation 004 copy
The rules are:
Love the Lord your God
Keep your promises.  Integrity matters.
Wash your hands
Clean up, even if you didn’t make the mess
Be respectful.  Talk nicely.
Read more…watch tv less
Always tell the truth
Obey your parents
There’s no mine in this house…it’s all God’s.  (LOVE that one!)
Be nice to your siblings…encourage them, stick up for them, believe in them.
Be creative. Laugh at your mistakes.  Embrace the possibilities.
Mind your manners.  Say “please” and “thank you.”
Husband love your wife.  Wife respect your husband.
Say your prayers, thank God for this family.

Monday, August 30

Mirror Revamp

I think I've mentioned before that we're pretty frugal around here, you might even call us cheap but that would be tacky so please don't.  When I was redoing the kids rooms, I spent a morning or two scrouring our local Goodwill stores looking for shelves and picture frames.  I came across this mirror for $2.49!  I knew instantly it would make a great mirror in my daughter's room.

First, I covered the mirror with painters tape and paper.  Take your time getting in the corners.


Give it a good coat of spray paint, I choose white. Then I attached a pretty ribbon to the back. I just used thumbtacks, but you could staple or glue it.  Then, I added a shabby chic fabric rosette to give it a little more "something."  Then I made sure to hang at my daughter's height. :)
Do not notice the messy room in the background.  But do notice one of the sources, you can see the baby dumping out a box of his sisters beads onto the floor.  I'm starting to question why I would put the two messiest people in the house in the same room!


To make the flower rosette, tear a piece of fabric about 1.5 inches wide and 44 inches in length.  Sew a long basting stitch down one side, pull on a thread until the fabric draws up into a ruffle, twist into a flower shape and stitch on a button catching all layers to secure.  If you don't have fabric, you could use ribbon, or a even a fake flower with the stem snipped off.  

I love the mirror and so does my daughter!

I'm linking up to Transformation Thursday. :)

Thursday, August 5

today is brought to you by the letter "H"

Yes, we watch too much Sesame Street around here, but anyways.  I've been wanting a cute letter H (for our last name) to decorate around the house for a long time now.  Being the frugal minded people we are, though, I couldn't justify spending a lot of money on one.  So I made one.

Here's what I did and it's super simple.

I took a paper mache letter and a pretty piece of scrapbooking paper. Trace the letter to the back side of the paper.  Then I used a trusty can of spray paint from our stash to give it a good coating, luckily I had a coordinating color.  I used the tricky can of spray adhesive to stick the paper to the letter.  Once dry, I used a mix of white school glue and water to paint over the whole thing.  (It's cheaper than modge podge, like I said we are frugal)


I saw where someone else had pinned a cute little paper flower on a letter and LOVED it.  So I cut out three layers of "petals" to create my flower.  I glued a thumbtack to the back of a fabric covered button I just happen to have on hand (lucky me) and viola!

Though, if I'm totally honest I don't know if I love it.  I mean I like it, but do I LOVE it?  Regardless, I'm sure the baby will find it and tear it up in no time.  Seriously, he's already thrown the phone at the lamp leaving a black mark.  He's cute, but he's a stinker.

Tuesday, August 3

Goodwill lamp find!

I've needed another table lamp in my family room forEVER!  The baby had knocked, ahem...pushed, over the little side table sending my lamp over and into the wall length windows cracking a window pane and breaking the lamp. Luckily he's cute and was only about 9 months old so.  Now, he's nearing two and I thought it was about time to replace the thing.  Replace the lamp that is, not the baby. :)

I've been looking for awhile for a small lamp and was cute and not too expensive.  Um, that's hard.  I had to go do a Goodwill drop off which usually means a quick looksie to see what's there.  This time they finally had a lovely little lamp and it was only $5.  It looked pretty good by itself, but it was too creamy for me.  (Excuse the poor picture!)  I wanted white which made this a quick fix.  A little primer, a little white spray paint, and she was done. :)  I went through my fabric stash and recovered an old lamp shade I had on with the cutest little scrap of green fabric.


So happy!  If you don't look too closely, that is.


Using spray adhesive makes me feel like I have the gluing skill of 3 year old!  I swear, I get that stuff ALL over my hands and have the worst time getting it even and smooth.   But, really with my kids who break lamps and decorate the lampshade themselves, I'll probably only get a few months out it anyways!

I'm linking up here:
(I've never done this before, lets hope I do it right!)
beforeAndAfterButton
and The Shabby Nest

Wednesday, July 7

homemade play dough

We're kind of stuck in the house these days.  One child is sick which means EVERYBODY has to stay home.  It's brutally hot which means no one wants to go outside except for a few minutes early in the morning.  I'm sorry, but I melt when it reaches 99 degrees before noon.  Ugh... I hate hot, hot weather like this!

I've been trying to find things for the kiddos to do that keeps all ages happy reasonably satisfied.  I pulled out the trusty play dough recipe today when I discovered the play dough had all turned to rock.  I love this recipe!
1 c flour
1/2 c salt
1 c water
2 tsp cream of tartar
1 T cooking oil

Combine all ingredients and cook over low heat until thick.  Don't get discouraged if it takes too long, just keep stirring!  Once, it's firmed I like to give the dough a good kneading on a well-floured surface until it's a good consistency.  Then simply add the food coloring of your choice!  Quick and easy.

It might not look like in the photo, but there is a difference between the purple and the blue!

Thursday, February 18

Crayon Ice Cubes

recycled crayon ice cubes
Finally, I delved into the world of melted crayons!  It seems like everyone has done this craft with their kids, except me.   Instead of using candy molds, I used an old ice cube tray from my baby food making days.   We filled the holes with broken crayons and I popped that thing right into the 300 degree oven.  I had my fingers crossed the whole time that the tray wouldn't melt right along with the crayons!  Luckily, it didn't or there would have been a HUGE mess to clean up and this post would be quite a bit different.    I think they turned out cute as can be and they are the perfect size for little hands.  Now, go make some!

Tuesday, December 1

Christmas Decorating

I hope y'all had a fabulous Thanksgiving! Mine was good, but I don't think I turned out the feast I had been expecting. I blame it on my 25 year old stove that seems to be a little off. The poor girl's a little tired, I'm afraid. But, I'll just forget about the less than stellar Thanksgiving dressing and rolls, and focus on Christmas decorating instead.

I tend to do the same thing year after year when it comes to Christmas decorating. Do y'all find yourself doing that, too?

It's the same frou frou draped around the dining room lights with the baubles hanging down....

A cute little Santa scene....

Oh, and let's not forget the football playing Santa...

What, you don't like football? Maybe you prefer a snowboarding Santa instead....


I'm adding some great ideas I've come across in hopes of breaking out of my decor rut. :)

Thrifty Decor Chick has such great ideas and they are do-able, too!
There's a really cute Christmas tree tutorial over at Pretty Ditty.
And this topiary is absolutely precious!

Wednesday, May 27

i haven't fallen off the face of the earth!


I swear, I haven't! I've just been so incredibly busy. But the kids are all in their rooms "resting", yeah right, so I have a moment to spare. The big thing I've been busy with is going through our home reducing our amount of stuff and just making sure that everything in here is something I love. I've also been creating things for our home which I hadn't done in ages due to being so busy with Etsy. I started in our foyer since that is the first thing people see when they enter my home. I replaced a bulky black dresser with a smaller open table that I painted white. I just picked it up at one of those unfinished furniture stores. Love those! Then I made this little table topper from my scraps to go on top. I wish it had came out a little larger, but oh well, I still really like it. Plus, it was a great way to get more practice in machine quilting. I'm still new at stippling. I used this pattern except I made it with smaller squares (2.5 x2.5 inches) and I only used one randomly placed line of ric rac because I didn't find my stash of it until I had finished the quilt.
Don't you love the little birdie!

Then I started going through the front closet trying to weed out everything I didn't need. The plan was to sell the stuff on Craigslist. Well, I posted things, and I had some nibbles but no bites. I started mentally to get bogged down in the whole process that I had trouble finding motivation to finish. I finally decided that I don't need the $20 I MIGHT be able to make off my old prom dress. I have no sentimental attatchment to the thing. I don't need to the $5 I COULD make off the plastic thread organizer I never used. Or the ugly tablecloth I was given or the one that I bought a long time ago and have no use for.

So, I told my husband it's not worth me trying to sell this stuff. I'm just going to give it all away.

And, ahhh, it feels so much better now.

I can move on to other projects now that I don't have the mental block against getting rid of any clutter. I just give it away to Goodwill and I move on.

Wednesday, January 28

Feed the birds


I came across this great activity to do with kids. Birdseed cookies! Natalie and I whipped these birdie treats up the other day and they were super simple. It was quick, it was easy enough for little children, and it was a great way to teach her the importance of taking care of God's creatures. That's a winner in my opinion.

Mix up 1 1/2 cups of birdseed, 2 T. flour, and 1/4 cup of water. Spray some cookie cutters with cooking spray and place on top of pan covered with aluminum foil. Pack the birdseed inside and then place a piece of straw towards the top of birdseed cookie which will create a hole as it bakes. Bake at 170 or so for about an hour. When it's done, remove straw and using ribbon tie it on a tree so you can sit back and watch your bird friends come to lunch.

Poor Natalie, though, was expecting the birds to come and dine right away. I had to explain it might take them awhile to discover their snacks. I just hope the wind that came later today didn't destroy them!

Wednesday, December 10

cookie houses


Growing up my mom and I would make gingerbread houses. We'd make the gingerbread cookies and cut them just so. It was a lot of fun and made for some great memories. Now, I make houses with my own children. Except, this mama makes things easy! I mean, really, my kids are so young they just want to do the decorating and the sneaking of candy into their little mouths. I don't like to buy those gingerbread kits, because you never know if those were left over from last year's supply, plus it takes the creativity out of it. We like to pick out our own candy.

So for several years now, we use graham crackers as our "gingerbread" for the houses. That way you get right down to the fun stuff! My kids did a great job on our houses this year. My favorite is the little snowman my son made! One day when they are bigger I might want to challenge us to create it from actual gingerbread, but right now since is just more fun.

I remember one year when my daughter was two, our cookie house kept "mysteriously" losing the candies. By Christmas, the house had pockmarks from where she had snagged the candy off! :)

Thursday, December 4

Great kids craft!


I wish I could claim this idea as one of my own, but it's not. It's from the Family Fun Magazine website. It was so much fun to make with the kids. Here's a few tips:
1. Buy more fabric paint than you think you need. It took my kids a few trial runs to get the right flow going, which meant wasted paint.
2. Go over the flakes and make sure all lines meet.
3. Once you get them on your window, you don't want to keep repositioning them. They can become less clingly.

Have fun!

LinkWithin

Related Posts with Thumbnails